
Auth
TrailBase provides core authentication flows: APIs and a basic UI out of the box1. These flows allow your users to log in thus establishing their identity to authorize or deny access, lets them change their email address, reset their password, etc.
Integrating Auth
Section titled “Integrating Auth”At an abstract level, whenever a user signs in, either directly with
(email and/or username) +password or via an external OAuth2 provider
(Google, Microsoft, …), they receive a set of tokens minted by your TrailBase
instance.
Users or a backend of yours should then attach the auth token to their
TrailBase API requests to identify themselves. TrailBase will then accept or
reject the request based on the user’s authorization.
With this in mind, integrating auth into your application mostly means:
- Providing UI flows for users to sign in, log out, change passwords, … .
You can either build your own UI using TrailBase’s auth APIs or rely on the
built-in UIs mounted at
/_/auth/(login|logout|...)1. - And managing tokens, e.g. making sure they get attached to request or dropped when the user logs out. The TrailBase client libraries can help you with that.
There are a few considerations, which may affect your choices:
- Are you building a mobile/desktop or web app or both? If you’re building for mobile or desktop, do the auth UIs need to be native or is ok to open a WebView?
- If you’re planning to build your own auth UIs for multiple platforms you may need to implement them multiple times.
- If you’re building something other than a web app and are planning to support sign-in using external OAuth providers, you’ll need a Browser or WebView anyway for users to sign in on the external provider’s site.
The examples/blog/(web|flutter) demonstrates how the built-in UIs, including
OAuth via WebView, can be used by both web and mobile/desktop apps2.
When using the built-in UIs, the general approach is to send users to
/_/auth/(login|logout|profile).
When building your own UIs, sign-up is handled by
/api/auth/v1/register and login by:
/api/auth/v1/loginfor password auth. It directly exchanges valid credentials for tokens./api/auth/v1/oauth/<PROVIDER_NAME>/loginfor OAuth issuing a redirect to the external provider. The redirect will also contain the redirect uri back to your TrailBase instance for the external provider to send your users to upon successful sign-in.
Authentication Code Flow & PKCE
Section titled “Authentication Code Flow & PKCE”Whenever a native client-side app (mobile, desktop, …) or different-origin web app defers to a web UI3 for their users to sign in, a protocol for exchanging the tokens is needed.
The authentication code flow defines such a protocol. Upon successful off-site sign-in with an external provider, users are redirected back,
- first to your TrailBase instance at
<YOUR_SITE>/api/auth/v1/oauth/<PROVIDER_NAME>/callback?code=<AUTH_CODE> - and subsequently to a URI registered and provided by your app via
?redirect_uri=my-app://callback.
This allows TrailBase to observe the external provider’s auth code and issue
one to your app as well.
After observing the callback with the auth code4, the app can
exchange it, typically alongside another secret, for tokens using the
/api/auth/v1/token
endpoint, thus completing the signing.
Proof-Key-for-Code-Exchange (PKCE) provides an elegant way to establish the secondary secret and also protects against man-in-the-middle attacks by infected or malicious browsers/WebViews. Authentication code flow with PKCE results in a two-step login procedure:
login(creds, pkce_code_challenge) -> auth_codeupgrade(auth_code, pkce_code_verifier) -> tokens
where pkce_code_verifier is simply a client-generated random secret and
pkce_code_challenge is a hash thereof.
Since only the first step is mediated by an external application (browser or
WebView), the subsequent token exchange cannot be intercepted.
To initiate the authentication code flow with PKCE you have to additionally pass:
response_type=code,pkce_code_challenge=<urlSafeBase64(sha256(pkce_code_verifier)))>,redirect_uri=<TARGET>, e.g.custom-app-scheme://callback,
as inputs to /api/auth/v1/login or /api/auth/v1/oauth/<PROVIDER_NAME>/login.
Note that native apps will need to register the custom scheme first to receive
the eventual callback.
Design
Section titled “Design”TrailBase tries to offer a standard, safe and versatile auth implementation out of the box. It combines:
- Asymmetric cryptography based on elliptic curves (ed25519)
- Stateless, short-lived auth tokens (JWT)
- Stateful, long-lived, opaque refresh tokens.
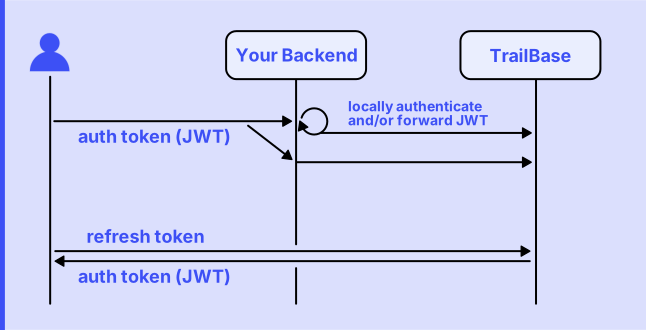
Breaking this apart, asymmetric cryptography means that tokens signed with a private key by the TrailBase “auth server”, which can then be validated by others (“resource servers”) using only the corresponding public key. The Stateless JWTs contain metadata that identities the user w/o having to talk to the auth server. Combining the two, other back-ends can authenticate, validate & identify, users hermetically. This is very easy and efficient, however means that hermetic auth tokens cannot be invalidated. A hermetic auth token released into the wild is valid until it expires. To balance the risks and benefits, TrailBase uses short-lived auth tokens expiring frequently5. To avoid burdening users by constantly re-authenticating, TrailBase issues an additional opaque, stateful refresh token. Refresh tokens are simply a unique identifier the server keeps track of as sessions. Only refresh tokens that have not been revoked can be exchanged for a new auth token.
Available Flows
Section titled “Available Flows”TrailBase currently implements the following auth flows:
- (Email and/or username) + password based user registration and email verification.
- User registration using social OAuth providers (Google, …)
- Anonymous sign-in (i.e. registration) as an ephemeral user and promotion to a full account.
- Login & logout.
- Change & reset password.
- Change email.
- Change username.
- User deletion.
- Avatar management.
Besides the flows above, TrailBase also ships with a set of simple UIs to
support the above flows. By default it’s accessible via the route:
<url>/_/auth/login. Check out the demo.
The built-in auth UIs can be disabled with --disable-auth-ui in case you
prefer rolling your own or have no need web-based authentication.
User Identifiers (Email and/or Username)
Section titled “User Identifiers (Email and/or Username)”Strictly speaking, authentication is only responsible for uniquely identifying who’s on the other side. This requires a unique identifier and one or more secrets (e.g. a password, second factor, …) for the peer to proof they’re them.
Any unique identifier will do: a random string (painful to remember), a phone number, a username, or an email address. Email addresses are a popular choice, since they do double duty as a communication channel letting you reach out to your users, e.g. to reset their password. Besides, for many products like online shops, email addresses are the natural choice: they remain private and allow sending order confirmations, etc. For more public uses, it may make sense to add a username to the mix or use usernames exclusively to avoid leaking your users’ email addresses.
Which identifier users need to provide, i.e. email address and or username, is governed by a configurable policy, which can be set either via the admin dashboard (Settings → Auth) or configuration. The available policies are:
| Policy | Behavior |
|---|---|
| OnlyEmail default | Email required. Username not used. |
| RequireEmail | Email required. Username optional. |
| OnlyUsername | Email not used. Username required. |
| RequireUsername | Email optional. Username required. |
| RequireEmailAndUsername | Both, email and username required. |
Requiring an email address is encouraged. Choosing a policy that omits email means TrailBase cannot send password-reset emails and you don’t have the means to contact your users (e.g. send an invoice, updated ToS, …).
The auth-ui login form adapts automatically to match the active policy.
You should avoid changing the policy post launch.
For example, switching from OnlyUsername to OnlyEmail
will lead to an inconsistent user DB and when using the first-party auth UI
leave username-only users w/o the means to re-authenticate.
Sign-Up
Section titled “Sign-Up”New accounts are created via
/api/auth/v1/register, which takes an
email and/or a username alongside password and password_repeat, subject
to the identifier policy above.
Whenever an account carries an email address, TrailBase sends out a verification
email and the account cannot sign in until that address has been confirmed.
Username-only accounts have nothing to verify and can sign in right away.
All clients expose this as a register method, which registers the account but
never signs it in; follow up with a login where that is applicable.
// A confirmation mail is sent, the account cannot sign in yet.
// Username-only accounts have nothing to verify and can sign in right away.await client.register({ username: "alice", password: "s3cr3t!" });await client.login("alice", "s3cr3t!");client .register(RegisterOptions { password: "s3cr3t!".to_string(), ..Default::default() }) .await?;err := client.Register(trailbase.RegisterOptions{ Password: "s3cr3t!", Email: &email,})curl --header "Content-Type: application/json" --request POST http://localhost:4000/api/auth/v1/registerAn optional redirect URI controls where the link in the verification email sends
users after confirming. The target needs to be covered by the
redirect_uri_allowlist configuration.
Note that registration reports success even when the account already exists, so
that the endpoint cannot be used to enumerate your users’ email addresses.
Password-based sign-up can be disabled altogether under Settings → Auth, in
which case registration is rejected with 403.
Anonymous Authentication
Section titled “Anonymous Authentication”Anonymous sign-in can allow users to start using your app without creating a full account first, i.e. email sign-up, followed by verification, followed by sign-in. In the anonymous case, a password-less user is created behind the scenes and tokens are issued just like it would normally do when signing in.
Anonymous auth must be explicitly enabled in the admin dashboard under Settings → Auth or via the configuration.
Constraints:
Section titled “Constraints:”- Single sign-in only. Anonymous users cannot re-authenticate once their refresh token expires. They are tied to a single token and cannot be shared across devices.
- 90-day TTL. Ephemeral users are garbage-collected after approximately 3 months if they have not been promoted to a full account.
- No OAuth promotion yet. Promoting an anonymous user to an OAuth-backed account is not yet supported; only password-based promotion is available.
Sign-In & Promotion
Section titled “Sign-In & Promotion”All client libraries across all languages support anonymous login, here’s a brief example to get you started.
await client.loginAnonymously();await client.promoteAnonymous({ new_password: "s3cr3t!",});
// WARN: logging out will orphan the newly created anonymous user. Signing back into// the same account is impossible.client.logout()curl --header "Content-Type: application/json" --request POST --data '{}' http://localhost:4000/api/auth/v1/login_anonymous
curl --header "Content-Type: application/json" --header "Authorization: Bearer ${AUTH_TOKEN}" --request POST http://localhost:4000/api/auth/v1/promote_anonymousThe response of the initial sign-in is the same token payload as for normal
logins. The resulting user will have an auto-generated username of the form
anon<6-char-suffix> and no email or password set.
Lifetime Considerations when Persisting Tokens
Section titled “Lifetime Considerations when Persisting Tokens”If you decide to implement your own authentication flows and persist tokens,
it’s your responsibility to clean them up appropriately when a user logs out,
otherwise users may still appear to be logged in.
Specifically, when browsing to /_/auth/logout or directly invoking the
log-out API (/api/auth/v1/logout), the session will be instantly invalidated.
In browser environments, cookies carrying tokens will also be removed.
Session invalidation results in the refresh token no longer being valid.
However, the auth token will remain valid until it expires. In other words, to
ensure that users don’t appear as logged in anymore, any auth token you may
have persisted should be dropped.
This is especially relevant for anonymous users: once the anonymous session’s refresh token expires (or is revoked at logout), there is no way to re-authenticate as that ephemeral user. Any protected, associated data will therefore become inaccessible.
Footnotes
Section titled “Footnotes”-
Which can be disabled using
--disable-auth-ui, if you prefer rolling your own or have no need for a web-based authentication UI. ↩ ↩2 -
The approach is similar for any native application. This example uses Flutter and can run both on Mobile (iOS, Android) and Desktop (Windows, MacOS, Linux). ↩
-
Both for TrailBase’s built-in auth UIs and custom UIs. ↩
-
An intermediary code is used since tokens can get reasonably large and in-lining them would be brittle as well as interceptable. ↩
-
A one hour TTL by default. ↩